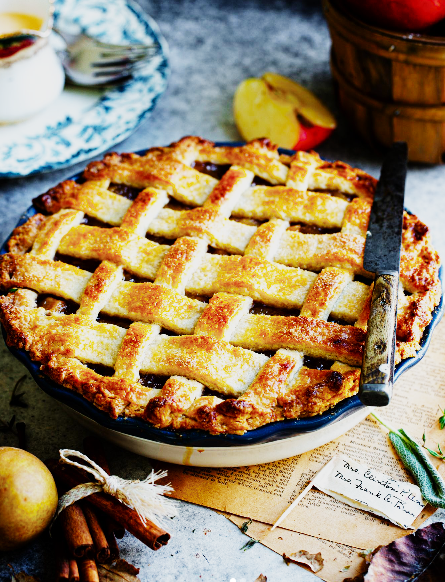
The BEST Apple Pie Recipe for a Perfect Homemade Dessert
There is something undeniably comforting about a warm, homemade apple pie fresh from the oven. The buttery aroma of golden crust mingling with sweet cinnamon apples instantly makes the kitchen feel cozy. Whether it is for a holiday gathering, a weekend baking project, or simply a craving for an old-fashioned dessert, The BEST Apple Pie Recipe never goes out of style.
This pie brings together tender, juicy apples tucked inside a flaky, buttery crust with just the right amount of warm spice. Every slice has that perfect balance of sweet filling and crisp pastry, especially when served slightly warm with a scoop of vanilla ice cream melting over the top. It feels nostalgic, comforting, and special all at once.
What makes this homemade apple pie recipe stand out is how approachable it is for beginners while still delivering bakery-worthy results. With simple pantry ingredients, fresh apples, and a few helpful baking tips, you can create a classic apple dessert that looks beautiful and tastes even better. From the bubbling apple pie filling to the crisp golden top, every bite feels like pure comfort.
If you have been searching for an easy apple pie recipe with a flaky crust and rich cinnamon apple flavor, this one deserves a place in your recipe collection.
Why You’ll Love This Recipe
There are plenty of apple pie recipes out there, but this one earns a permanent spot in the recipe box for good reason. It is simple enough for beginners, yet special enough to proudly serve during holidays and family gatherings.
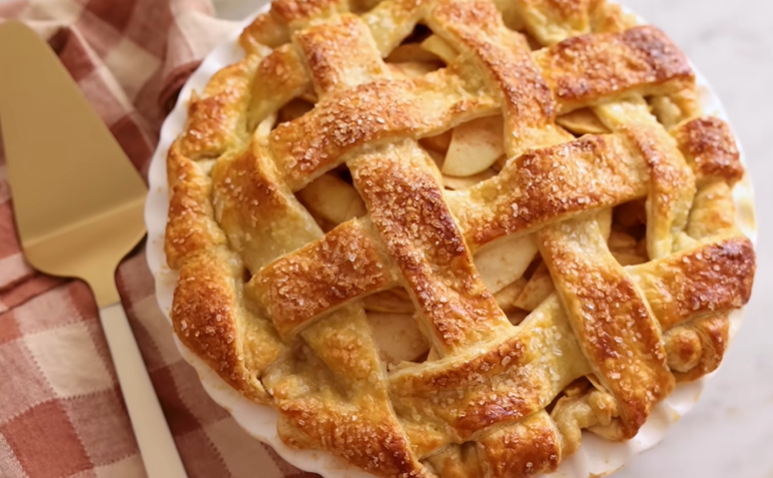
A flaky, buttery pie crust
The crisp golden crust bakes up beautifully with tender, flaky layers that hold the sweet apple filling perfectly. Whether you make homemade pie dough or use a quality store-bought crust, the result is wonderfully comforting.
Warm cinnamon apple filling
Every bite is filled with tender sliced apples coated in a rich cinnamon-spiced sauce. The filling turns perfectly thick and glossy as it bakes, creating that classic homemade apple pie texture everyone loves.
Easy enough for beginner bakers
You do not need advanced baking skills to make The BEST Apple Pie Recipe. The step-by-step process is approachable, and a few simple tips make it easy to avoid common pie mistakes.
Perfect for holidays and special occasions
This classic apple pie feels right at home on a Thanksgiving dessert table, but it is just as lovely for weekend dinners, birthdays, or cozy fall baking days.
Made with simple pantry ingredients
No complicated ingredients here. Fresh apples, cinnamon, butter, sugar, flour, and pie crust come together to create a bakery-style dessert from everyday kitchen staples.
Great for make-ahead baking
Apple pie stores beautifully and tastes just as comforting the next day. You can even prepare it ahead for busy holiday schedules or freeze it for later.
Easy to customize
Prefer a sweeter pie? Want to mix apple varieties? Looking for a dairy-free option? This recipe is flexible enough to suit your preferences without losing that homemade charm.
That classic homemade taste
The combination of buttery crust, tender apples, warm spice, and bubbling filling creates the kind of nostalgic dessert that keeps people coming back for another slice.
Ingredients
One of the best things about The BEST Apple Pie Recipe is that it comes together with simple, everyday ingredients. Each one plays an important role in creating a rich apple filling and a beautifully golden crust.
For the Pie Crust
- 1 double pie crust recipe (or 2 prepared pie dough rounds): Homemade crust gives the pie a buttery, flaky texture, but a good-quality store-bought crust works well too.
For the Apple Filling
- 2¼ pounds of apples (about 6 to 7 medium apples): Granny Smith apples are a great choice because they hold their shape while baking and balance the sweetness nicely. About 7 cups of thinly sliced apples is ideal.
- 1½ teaspoons ground cinnamon: Adds warm, cozy spice that complements the apples beautifully.
- 8 tablespoons unsalted butter: Helps create a rich, smooth filling with deep homemade flavor.
- 3 tablespoons all-purpose flour: Thickens the apple pie filling so it turns glossy instead of watery.
- ¼ cup water: Helps create the silky sauce that coats the apples.
- 1 cup granulated sugar: Sweetens the filling while balancing tart apples. You can slightly adjust based on the apple variety.
For the Egg Wash
- 1 large egg
- 1 tablespoon water
Brushing the top crust with egg wash helps create that shiny, golden-brown finish that makes homemade apple pie look bakery-worthy.
Optional Add-Ins for Extra Flavor
- ¼ teaspoon nutmeg: for deeper warm spice
- 1 teaspoon vanilla extract: for a subtle sweet aroma
- A pinch of sea salt: to balance sweetness and enhance flavor
Using fresh, crisp apples and good butter makes a noticeable difference in both flavor and texture, so if possible, choose quality ingredients for the best homemade apple pie results.
Kitchen Tools Needed
You do not need fancy baking equipment to make The BEST Apple Pie Recipe, but having a few helpful tools on hand makes the process smoother and more beginner-friendly.
Must-Have Tools
9-inch pie dish: A standard deep pie dish works best for holding all that juicy apple filling without overflowing.
Mixing bowls: You will need a large bowl for tossing the sliced apples and a smaller one for preparing the filling mixture.
Medium saucepan: Used to create the buttery cinnamon sauce that thickens the apple filling.
Sharp knife or apple peeler: Helpful for peeling, coring, and slicing apples evenly.
Cutting board: Makes prep safer and easier while slicing apples.
Rolling pin: Essential if you are using homemade pie dough or rolling out store-bought crust.
Measuring cups and spoons: Accurate measurements help create the perfect apple pie texture and sweetness.
Whisk: Useful for making a smooth, lump-free filling sauce.
Pastry brush
Makes applying egg wash quick and easy for that shiny golden crust.
Helpful Optional Tools
Apple slicer/corer: A big time-saver if you make apple desserts often. It quickly cores and slices apples evenly.
Pizza cutter or pastry wheel: Perfect for cutting clean strips if you want a classic lattice pie crust.
Pie shield or aluminum foil: Prevents the crust edges from browning too quickly during baking.
Cooling rack: Allows the pie to cool evenly, helping the filling set properly before slicing.
Beginner Tip
If this is your first homemade apple pie, keep things simple. A regular top crust works beautifully if a lattice design feels intimidating. The flavor will still be every bit as comforting and delicious.
Step-by-Step Instructions
Making the BEST Apple Pie Recipe is easier than it looks. Follow these simple steps for a golden crust and perfectly tender apple filling every time.
Prepare the Pie Dough
If making a homemade pie crust, prepare it ahead of time and let it chill in the refrigerator for at least 1 hour.
Cold dough is key to a flaky, buttery crust. If using store-bought pie dough, let it sit at room temperature for a few minutes so it becomes easier to roll without cracking.
Meanwhile, preheat your oven to 425°F (220°C) and position the oven rack in the center.
Make the Apple Filling Sauce
In a medium saucepan over medium heat, melt the butter.
Whisk in the flour and stir constantly for about 1 minute until smooth. Slowly whisk in the water and sugar.
Bring the mixture to a gentle simmer and cook for about 3 minutes, stirring often, until slightly thickened and glossy.
Remove from heat.
Helpful tip: Avoid overcooking the sauce. If it gets too thick, the filling may lose its silky texture.
Prepare the Apples
Peel, core, and thinly slice the apples into even slices, about ¼ inch thick.
Place the apples in a large bowl and sprinkle with cinnamon. Toss gently until coated.
Pour the warm sauce over the apples and mix until every slice is lightly covered.
At this point, the apples should look glossy and smell warmly spiced.
Roll Out the Bottom Crust
Lightly flour your work surface and roll one pie crust into a 12-inch circle.
Carefully transfer the dough into a 9-inch pie dish, gently pressing it into the bottom and sides without stretching.
Let any extra dough hang over the edges for now.
Fill the Pie
Spoon the apple mixture into the pie crust.
Slightly mound the apples toward the center for a fuller-looking pie.
Try not to let excess filling touch the crust edges, as this can make sealing more difficult.
Add the Top Crust
Roll out the second crust into about an 11-inch circle.
You have two options:
Classic full crust:
Place the dough over the apples and cut a few small slits on top to release steam.
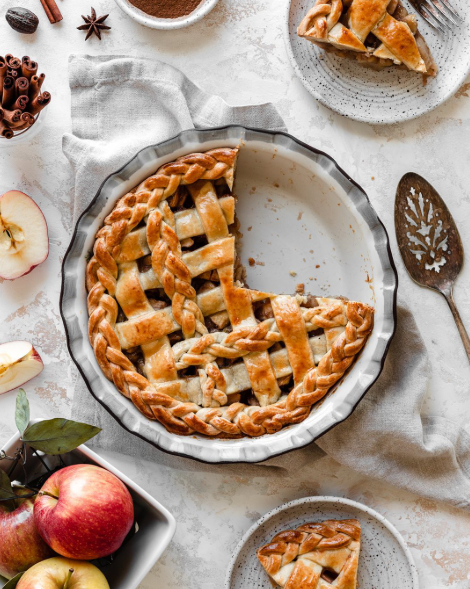
Lattice crust:
Cut the dough into even strips and weave them over the pie for a traditional bakery-style look.
Trim excess dough and crimp the edges to seal.
Brush with Egg Wash
Whisk together the egg and water.
Brush the top crust lightly with the mixture. This gives the pie a beautiful golden finish and slight shine after baking.
Bake the Pie
Place the pie on the center rack and bake at 425°F for 15 minutes.
Then reduce the oven temperature to 350°F (175°C) and continue baking for 45 to 50 minutes.
The pie is ready when:
- The crust looks deep golden brown
- The apples are tender
- Thick juices bubble through the top for several minutes
If the edges brown too quickly, loosely cover them with foil or use a pie shield.
Helpful baking tip: Place a baking sheet or foil on the rack underneath to catch any bubbling drips.
Let the Pie Cool
Once baked, transfer the pie to a cooling rack and let it rest for at least 1 hour before slicing.
This step matters. Cooling allows the apple pie filling to thicken and set properly, giving you cleaner slices instead of runny filling.
Serve warm or at room temperature with vanilla ice cream or a dollop of whipped cream for an extra cozy finish.
Expert Tips
Want your homemade apple pie to taste as if it came from a bakery? These practical tips can help you get a flaky crust, tender apples, and a beautifully balanced filling every time.
Keep the Pie Dough Cold
Cold pie dough creates flaky layers.
If the dough becomes too soft while working, place it in the refrigerator for 10 to 15 minutes before continuing. Warm dough can melt too quickly in the oven, leading to a flatter, less crisp crust.
Slice Apples Evenly
Try to keep apple slices close to the same thickness, around ¼ inch.
Thin, even slices cook more consistently and help prevent a mix of mushy and undercooked apples in the filling.
Mix Apple Varieties for Better Flavor
For a more layered flavor, combine tart and sweet apples.
A mix like Granny Smith, Honeycrisp, or Pink Lady, Golden Delicious creates a filling with more depth and a better balance of sweetness and tartness.
Do Not Skip the Egg Wash
Brushing the crust with egg wash helps create that rich golden color that makes apple pie look fresh from a bakery.
For extra sparkle, lightly sprinkle coarse sugar over the crust before baking.
Avoid a Soggy Bottom Crust
Nobody wants a soft, soggy pie bottom.
Here are a few simple tricks:
- Bake in the center or lower-middle oven rack
- Avoid overly juicy apple filling
- Make sure the filling sauce thickens slightly before mixing with apples
A properly baked pie should have a crisp, sturdy crust.
Protect the Crust Edges
Pie edges often brown faster than the center.
If the crust starts getting too dark midway through baking, loosely cover the edges with foil or use a pie shield while the center continues baking.
Let the Pie Rest Before Slicing
This may be the hardest step, but it makes a huge difference.
Cooling for at least 1 hour allows the filling to settle and thicken. Cutting too early can cause the juices to spill out and leave the filling runny.
Taste Your Apples First
Some apples are sweeter than others.
Take a quick bite before baking and adjust sugar slightly if needed. This simple step helps create a more balanced apple pie filling.
Add a Small Pinch of Salt
A tiny pinch of salt may seem small, but it helps bring out the buttery crust and warm apple flavor while balancing sweetness.
These little details can turn a good pie into The BEST Apple Pie Recipe you will want to bake again and again.
Variations
One of the best things about The BEST Apple Pie Recipe is how easy it is to customize. Whether you want a healthier option, a deeper spice flavor, or a diet-friendly version, these ideas make it simple to adapt the recipe to your taste.
Healthier Apple Pie Version
Looking for a lighter homemade apple pie?
Try these simple swaps:
- Reduce the sugar slightly, especially if using sweet apples like Honeycrisp or Fuji
- Replace part of the sugar with maple syrup or coconut sugar
- Use a whole wheat pie crust for extra fiber
- Add extra cinnamon for flavor without additional sweetness
You still get that warm, comforting apple pie flavor with a lighter touch.
Caramel Apple Pie
For a richer dessert, drizzle a few tablespoons of caramel sauce over the apples before adding the top crust.
The caramel melts into the filling, creating an extra cozy dessert with deep sweetness and buttery flavor.
Dutch Apple Pie Style
Skip the top crust and add a crumb topping instead.
Mix together:
- Flour
- Brown sugar
- Butter
- A little cinnamon
Sprinkle it over the apples before baking for a crisp, buttery topping.
Extra Spiced Apple Pie
Love warm spices?
Add:
- ¼ teaspoon nutmeg
- A pinch of cloves
- A little allspice
- Extra cinnamon
This version feels especially cozy during fall and holiday baking season.
Dairy-Free Option
Need a dairy-free apple pie?
Simply swap:
- Butter with plant-based butter
- Use a dairy-free pie crust if needed
The filling still turns rich and comforting with great texture.
Gluten-Free Apple Pie
To make a gluten-free version:
- Use a gluten-free pie crust
- Replace all-purpose flour with cornstarch or a gluten-free flour blend
This helps thicken the filling while keeping the texture smooth.
Mixed Berry Apple Pie
Add a handful of fresh berries like:
- Blueberries
- Cranberries
- Raspberries
The fruit adds color, tartness, and a fresh twist to traditional apple pie.
Mini Apple Pies
Instead of one large pie, divide the filling into ramekins or muffin tins with pie crust for adorable single-serving desserts.
These are great for parties, holiday tables, or portion-friendly treats.
Streusel Topped Apple Pie
Replace the top crust with a buttery streusel topping for extra crunch and sweetness.
The contrast between soft cinnamon apples and crisp topping tastes especially comforting when served warm.
Small changes can make this classic dessert feel completely new while still keeping the heart of a homemade apple pie intact.
Storage Instructions
Homemade apple pie stores surprisingly well, making it perfect for preparing ahead or enjoying leftovers over the next few days. Here is how to keep The BEST Apple Pie Recipe tasting fresh and delicious.
Storing at Room Temperature
If you plan to enjoy the pie within a couple of days, room temperature storage works perfectly.
- Let the pie cool completely before covering
- Cover loosely with foil or plastic wrap
- Store on the counter for up to 2 days
Keeping it uncovered while still warm can help prevent excess moisture from softening the crust.
Refrigerating Apple Pie
For longer freshness:
- Cover the pie tightly or place it in an airtight container
- Refrigerate for up to 4 days
The filling will stay flavorful, and the crust remains delicious, though slightly softer than fresh-baked.
Freezing Instructions
Apple pie freezes beautifully.
To freeze a baked pie:
- Allow the pie to cool completely
- Wrap tightly with plastic wrap, then aluminum foil
- Freeze for up to 3 months
To freeze an unbaked pie:
- Assemble the pie fully, but do not add egg wash yet
- Wrap tightly and freeze
- Bake straight from frozen, adding extra baking time as needed
This is especially helpful for holiday meal prep.
How to Reheat Apple Pie
For the best texture, avoid microwaving large portions since it can soften the crust.
Oven method (recommended):
- Preheat oven to 350°F (175°C)
- Cover loosely with foil
- Heat for 10 to 15 minutes or until warmed through
For single slices:
- Warm in the microwave for 20 to 30 seconds if you are short on time
A warm slice topped with vanilla ice cream tastes just as comforting the next day.
Make-Ahead Tip
You can bake apple pie 1 to 2 days ahead of serving, making it a great choice for Thanksgiving, family dinners, or holiday gatherings when oven space gets busy.
The BEST Apple Pie Recipe
Ingredients
Method
- Step 1: Prepare the DoughPrepare your pie crust and chill it for at least 1 hour. Preheat oven to 425°F (220°C).Step 2: Make the Filling SauceIn a medium saucepan, melt butter over medium heat. Whisk in flour and cook for 1 minute.Slowly whisk in water and sugar. Simmer for about 3 minutes until smooth and slightly thickened. Remove from heat.Step 3: Prep the ApplesPeel, core, and thinly slice apples.Place apples in a large bowl and toss with cinnamon. Pour the warm sauce over the apples and stir gently until coated.Step 4: Roll Out the Bottom CrustRoll one crust into a 12-inch circle and transfer it to a 9-inch pie dish.Gently press into place.Step 5: Fill the PieAdd the apple filling, slightly mounding in the center.Step 6: Add the Top CrustRoll the second crust into an 11-inch circle.Either:Cover with a full crust and cut steam vents, orCreate a lattice top using strips of doughSeal and crimp the edges.Step 7: Add Egg WashWhisk together egg and water. Brush over the crust for a golden finish.Step 8: BakeBake at 425°F for 15 minutes.Reduce heat to 350°F (175°C) and bake for 45 to 50 minutes, until golden and bubbling.If crust edges brown too quickly, cover loosely with foil.Step 9: Cool and ServeCool pie for at least 1 hour before slicing to allow filling to set.Serve warm with vanilla ice cream or whipped cream if desired.
Video
Notes
- Mix sweet and tart apples for a deeper flavor.
- Place foil or a baking sheet underneath the pie to catch drips.
- Letting the pie cool fully helps prevent runny filling.
- Store leftovers covered at room temperature for up to 2 days or refrigerate for up to 4 days.
- Skill Level: Easy
Nutrition (Per Serving)
- Calories: 380
- Carbohydrates: 55g
- Protein: 3g
- Fat: 18g
- Sugar: 31g
- Fiber: 4g
Frequently Asked Questions
What are the best apples for apple pie?
Firm apples that hold their shape during baking work best. Granny Smith apples are a classic choice because of their tart flavor, but Honeycrisp, Pink Lady, Braeburn, Golden Delicious, and Fuji also work well. Mixing sweet and tart apples often creates the best flavor.
Why is my apple pie watery?
A watery pie usually happens when there is not enough thickener or the pie is sliced too soon.
Let the pie cool for at least 1 hour after baking so the filling has time to set properly. Using flour or cornstarch also helps thicken the juices.
Should I cook apples before putting them in pie?
Not necessarily. For The BEST Apple Pie Recipe, the apples bake directly in the pie after being coated in the buttery cinnamon filling. This keeps the texture tender while still holding shape.
How do I keep the bottom crust from getting soggy?
To help avoid a soggy crust:
- Bake on the lower-middle oven rack
- Do not overload the filling with extra liquid
- Make sure the filling sauce thickens slightly before mixing with apples
- Bake until the filling bubbles well
Can I make apple pie ahead of time?
Yes. Apple pie is a great make-ahead dessert.
You can bake it 1 to 2 days in advance and store it covered at room temperature or in the refrigerator. It reheats beautifully before serving.
Do I need to peel apples for apple pie?
Peeling is recommended for the smoothest texture. Apple peels can sometimes become slightly chewy after baking, especially in a traditional homemade apple pie.
Can I freeze homemade apple pie?
Absolutely. You can freeze both baked and unbaked apple pie for up to 3 months. Wrap it tightly to help preserve freshness and prevent freezer burn.
How do I know when the apple pie is done baking?
Your pie is ready when:
- The crust is deep golden brown
- The filling bubbles through the vents or lattice top
- The apples feel tender when tested gently with a knife
Those bubbling juices are one of the best signs that the filling has been properly cooked.
Final Thoughts
There is a reason classic apple pie never goes out of style. From the flaky, buttery crust to the warm cinnamon apple filling, every slice feels comforting, familiar, and homemade in the best way. Whether you are baking for a holiday table, a cozy weekend dessert, or simply craving something sweet, The BEST Apple Pie Recipe delivers that timeless homemade taste people come back for again and again.
What makes this recipe especially rewarding is how approachable it is. Even if you are new to baking pies, the simple steps, helpful tips, and flexible ingredient options make it easy to create something truly beautiful from scratch. And once that golden pie comes out of the oven with bubbling apple filling and the smell of cinnamon filling the kitchen, the wait feels completely worth it.
Serve it warm with a scoop of vanilla ice cream, a drizzle of caramel, or simply enjoy a slice as it is. However you serve it, this homemade apple pie has a way of bringing people together around the table.
If you try this recipe, I would love to hear how it turned out for you. Did you use Granny Smith apples, mix different varieties, or add your own twist? Share your favorite version and baking tips in the comments. Happy baking!

Hi, I’m Connie Hope, a passionate home cook, writer, and food enthusiast who discovered the joy of cooking while sitting beside my mother in the kitchen. From learning how to blend spices and herbs to creating flavorful appetizers, homemade soups, salsas, chutneys, jellies, and jams, cooking has always been a creative journey for me.
I believe that the right side dishes can transform an ordinary meal into something truly memorable. Through my cookbook, In Addition…to the Entree, I aim to help families put delicious meals together quickly, easily, and enjoyably. Instead of eating out every night, why not discover the fun of home cooking with a little help from Connie?
Beyond cooking, I also enjoy growing orchids, reading, writing, researching, and organizing my class reunion projects.
📌 Connect with me:
Facebook: www.facebook.com/CookingByConnie
LinkedIn: www.linkedin.com/in/cookingbyconnie
Blog: cookingbyconnie.blogspot.com
About me: www.blogger.com/profile